
Staging, unstaging and the Index Editor
Git has a special place called the Index, which allows you to select only a subset of the current changes in your working tree for committing, rather than all of your changes. A typical scenario where this is useful is when you’re working on a larger feature involving the files A, B and C, and while working on these files, you discover several unrelated typos, which you want to fix and commit separately.
If the typos are in files other than A, B and C, the Index could be used, but is not really needed. For example, if the typos were in the files X and Y, you could simply select these two files in the Files view and click on the Commit button in the main toolbar. This is due to the fact that in SmartGit what will be committed is determined by the current selection. If you had selected the repository root in the Repositories view instead before committing, all changed files in the working tree would have been chosen for the commit.
Now, what if some of those typos were in files related to the feature you’ve been working on? In this case, Git’s Index is needed, because it allows you to not only pick out certain files for the next commit, but also certain chunks within files. In the following, let’s assume your typos were in the files C and D. Therefore, we need to put the entire file D, and all the relevant chunks in file C in the Index.
Putting something in the Index is called staging, and the opposite, i.e. moving something out of the Index, is called unstaging. Here’s how you stage and unstage an entire file (in this case file D) in SmartGit:
- Staging: On the Files view, select one or more files to stage. Then either click on the Stage button on the main toolbar, or select Local|Stage in the main menu.
- Unstaging: On the Files view, select one or more files to unstage. Then either click on the Unstage button on the main toolbar, or select Local|Unstage in the main menu.
For the file C, from which we want to stage only parts rather than everything, we need SmartGit’s so-called Index Editor. To open it, select the file in the Files view, then select either Index Editor in the file’s context menu, or select Local|Index Editor from the main menu. Here’s what the Index Editor looks like:
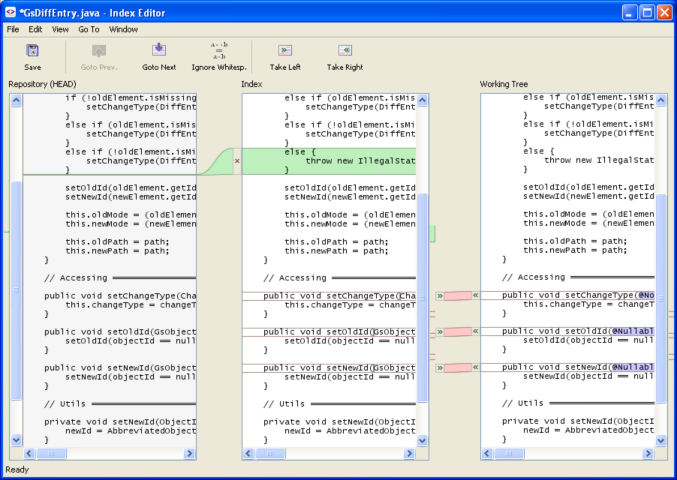
As you can see, the Index Editor consists of three separate text editors, which show the state of a particular file in the HEAD of the repository, in the Index, and in the working tree, respectively. Only the contents of the middle and the right editor can be modified. You can alter the contents of the Index either by editing the contents of the middle editor, or by moving chunks between the three editors. To do so, either click on the arrow and ‘x’ buttons between the editors, or click on the Take Left and Take Right buttons on the toolbar. After you’re done, save your changes and close the Index Editor.
Note that when you do a commit, you may have to choose at the top of the Commit dialog between committing the staged changes and committing the local changes. The former includes only the contents of the Index, while the latter includes all of your changes in the working tree, including the contents of the Index.