
Tools
The Tools preferences settings allow you to define external tools to assist you when using SmartGit:
- External Tools on the Tools menu
- Diff Tools for the Compare command
- Conflict Solvers for the Conflict Solver command
You can share your tools configuration with team members by using the Export button, and then Import the settings on your colleague’s computer.
Alternatively, the configuration is stored in tools.yml file in the settings directory.
External Tools
Default Tools
When first installed, SmartGit will configure a set of default tools:
- The Open File tool will invoke the system’s default open command, e.g. to launch a browser for
.htmlfiles. - The Open in Terminal tool will open the selected directory in the terminal application.
- The Open Git-Shell tool will open the repository in the Git shell.
If the Tool setup is not to your liking, you can revert the original default tool settings by clicking the Re-Add Defaults button.
Note
On SmartGit 22.1 and later, default tools have been cleaned up. The Git version is now displayed in the preferences, Fast-forward Merge has been implemented as SmartGit command.
If you are missing further tools from SmartGit version before 22.1 (e.g. Set Executable Flag, Format Patch, Apply Patch, Verify Database or Git Config), please download this file for Windows or Linux/MacOS and Import that in SmartGit.
Configure a Tool
Use Add or Copy to create a new tool (using the latter will copy all values from the currently selected tool for easier application of tiny changes).
The Command means just the executable file without any argument. The Arguments can contain following variables accessible using the drop-down button at the right:
${filePath}= the path of the selected file or directory, e.g.C:\repository\readme.txt${fileName}= the name of the selected file or directory, e.g.readme.txt${fileUri}= the URI of the selected file or directory, e.g.file://C:/repository/readme.txt${repositoryRootPath}= the root path of the repository, e.g.C:\repository${selectionFile}= the path of a temporary file containing all selected file paths, one file per line, e.g.C:\temp\selected-91235${remoteUrl}= the remote (push) URL of the repository, e.g.https://github.com/user/project.git${encoding}= the configured text file encoding, e.g.UTF-8${commit}= the (single or first) selected commit or ref (depending on the Handles: Refs, Commits, Both option), e.g.feature/new-layout${commit2}= the second selected commit or ref, e.g.feature/old-layout${fileOpen}= the path of a existing file that the user will have to select when invoking the tool, e.g.D:\download\my-patch.txt${fileSave}= the path of a file that the user will have to select when invoking the tool; if existing, the user needs to confirm the overwrite${dirSelect}= the path of a directory that the user will have to select when invoking the tool, e.g.D:\export${git}= the path of the configured Git executable, e.g.C:\Program Files\SmartGit\git\bin\git.exe${gitDir}= the (root) path configured Git installation, e.g.C:\Program Files\SmartGit\git${smartGitDir}= the (root) path of the SmartGit installation, e.g.C:\Program Files\SmartGit
If space-separated options should be one argument, you need to use double quotes (") to surround this argument.
If you need to use a double-quote in the output, use two double quotes ("").
The working directory when launching the tool will be the root directory of the corresponding repository (which may also be a submodule). When launching a tool on a set of files which belong to different repositories, it will be the closest common directory of all affected repositories.
If Can be used by the Open command is selected, SmartGit will consider to use this tool when invoking Open (or Open from Working Tree) in the Files view. The Handles: Files, Directories, Both and Handles: Refs, Commits, Both options determines on what selection the tool should operate, e.g. on file, directory, ref (tags or branches) or commit selection.
A file or directory name pattern may be specified in Applies To.
Note
For repository root directories, the name “” (empty string) is used as name which only is matched by the pattern “*”.
If Request confirmation before invoking is selected and a message is provided, the user needs to confirm this dialog’s message before the command is invoked. If Show output and wait until finished is selected, SmartGit waits until the command is finished and shows the output.
Example Tools
Format Patch
Save this content to a file format-patch.yml and use the Import button on the Tools page of the preferences to restore the Format Patch feature from SmartGit versions < 22.1.
tools:
- name: Format Patch
  fileStarter: {command: '${git}', parameters: 'format-patch -o "${dirSelect}" -1 ${commit}'}
  useForOpen: false
  waitUntilFinished: true
  filePattern: '*'
- name: Format Patch
  fileStarter: {command: '${git}', parameters: 'format-patch -o "${dirSelect}" ${commit}..${commit2}'}
  useForOpen: false
  waitUntilFinished: true
  filePattern: '*'
Open top-most Visual Studio solution from current repository
This powershell script can be used to open a solution file .sln inside a repository, in Visual Studio. The script iterates through the repository folders and looks for a .sln file. It stops at the first match and then launches Visual Studio.

Powershell script C:\SmartGit-Scripts\openVS.ps1
Install-Module VSSetup -Scope CurrentUser
$slnname = Get-ChildItem -Path $args[0] -Filter *.sln -Recurse -ErrorAction SilentlyContinue -Force | Select-Object -First 1 | Select-Object -ExpandProperty FullName

switch ( $args[1] )
{
    2017
    {
        $ver = '[15.0,16.0)'
    }

    2019
    {
        $ver = '[16.0,17.0)'
    }

    default
    {
        $ver = '[1.0,1000.0)'
    }
}

$devenv = Get-VSSetupInstance | Select-VSSetupInstance -Version $ver -Latest | Select-Object -ExpandProperty InstallationPath
$devenv = $devenv + "\Common7\IDE\devenv.exe"
Start-Process -FilePath $devenv -ArgumentList $slnname
Diff Tools
Info
Diff tools are (GUI) viewers of diff results. Diff tools are not related to the internal diff machinery of Git. If you want to customize the diff machinery itself, have a look at Git’s ‘diff.external’ config option.
SmartGit comes with a built-in diff tool which will be used by default to display results of various operations, like Show Changes. If you prefer, you can configure external diff tools which should be used instead. Following notable Arguments are available for an External diff tool:
${leftFile}represents the left (or usually “old”) version of the file${rightFile}represents the right (or usually “new”) version of the file${baseFile} represents the common base version of the file; depending on the context from which the diff tool is invoked, the common base is defined as:- the Index version, for a working-tree vs. Index comparison
- the HEAD version, for a working-tree vs. HEAD or a Index vs. HEAD comparison
- the version before the commit, for a single-commit comparison
- the merge base version of the two commits, when comparing two commits; this is similar to what SmartGit would display in case of conflicts
For certain files, like graphic files, there may be no appropriate left-right diff tool available. In this case you can configure an External viewer which has only a single ${file} argument and which will be launched by SmartGit two times: once for the old and once for the new file.
By default, the list of tools is searched from top to bottom and the first matching tool will be used. Alternatively, you can select Show chooser dialog if multiple entries match.
Conflict Solvers
SmartGit comes with a built-in conflict solver (three-way-merge) which will be used by default when invoking Query | Conflict Solver. If you prefer, you can configure external three-way-merge tools which should be used instead. The following Arguments can be passed to the configured External Conflict Solver:
${mergeFile}represents the resulting conflicting file, as-is in the working tree${leftFile}represents Git’s “ours” version of the file (:2)${rightFile}represents Git’s “theirs” version of the file (:3)${baseFile}represents Git’s “common” version of the file (:1)
(Git file stage version in parenthesis)
For details on how Git manages merge conflicts, and the meaning of ours, theirs, common and base files, refer to the Git manual.
Note: When launched, the external conflict solver should be configured to run as a background child process, as otherwise it will block SmartGit.
To avoid this (on Windows), use the bin\open.exe helper as follows:
- Command:
C:\Program Files\SmartGit\bin\open.exe - Arguments:
--no-wait "C:\Program Files\MyCompare\mycompare.exe" ${leftFile} ${rightFile} ${mergedFile}
where MyCompare\mycompare.exe is the path to the configured Conflict Solver tool.
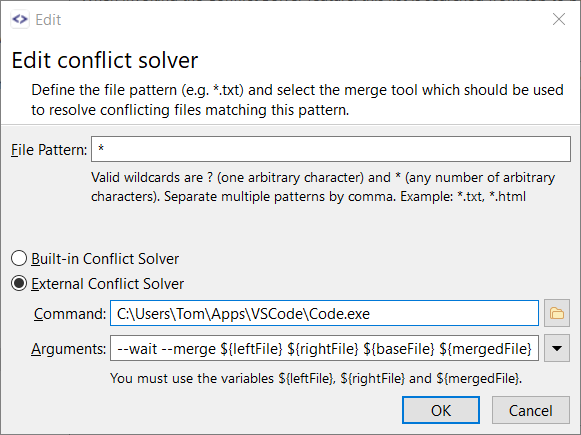
Example: VSCode
To configure VSCode 1.70 or higher as conflict solver, use --wait --merge ${leftFile} ${rightFile} ${baseFile} ${mergedFile} as Arguments.
Example: Unity Smart Merge Tool
To configure the UnityYAMLMerge, use merge -p ${baseFile} ${rightFile} ${leftFile} ${mergedFile} as Arguments. An example configuration could look like:
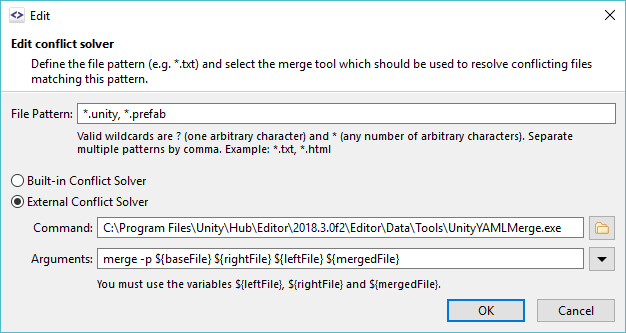
Note, that a compatible 3-way merge tool has to be configured as “fallback” for the Unity merge tool in order to complete the merge if the automatic merging is not successful.