
Git-LFS support in SmartGit
SmartGit provides support for common Git Large File Storage (Git-LFS) operations, allowing you to use LFS functionality such as LFS file tracking and locking, from the comfort of the SmartGit GUI.
Please refer to Git LFS concepts for background information and benefits of using Git-LFS on selected files in your repository.
Tip
The Git LFS extension must be installed on your local computer, and LFS filters must be enabled for any repository where LFS file storage will be used.
It is recommended that you use the version of the Git executable bundled with SmartGit and use SmartGit to enable and configure LFS in your repositories for best compatability.
Enabling Git-LFS on a Git Repository with SmartGit
After selecting the desired repository from the Repository View, go to Local | LFS | Install to enable LFS support for your repository.
SmartGit will prompt for confirmation. Select OK to confirm LFS support for the repository.
(This runs the equivalent git lfs install command in the repository.)
Tracking a new file in LFS
After adding a new file under the Working Tree of your local repository, select the untracked file in the Files View and use the LFS | Track command to track this file in LFS.
SmartGit will display a LFS Track dialog, prompting you to provide a tracking pattern:
- SmartGit will provide options to track only the selected file (e.g.
MyFile.png), or to track any file with the same extension (*.png) - You can edit the pattern to customize which files are tracked in LFS, e.g.,
File-*.png. (This is equivalent to runninggit lfs track MyFile*.pngfrom the Git command line.)
SmartGit will add the pattern into the .gitattributes file, which identifies files tracked by LFS.
Note
Remember to add and commit the
.gitattributesfile into your Git repository!
Locking LFS Files for Exclusive Editing
To prevent other users from concurrently editing a file tracked by LFS in your Git repository, you can lock the file on the LFS server to obtain exclusive modification access.
Note
The ability to perform LFS locking is disabled by default in SmartGit. To use LFS locking, toggle the Low-Level Property
status.lfs.lockstotrueto enable the Lock command in SmartGit.LFS file locking is only relevant after a repository and associated LFS files have been pushed to a remote server. If no LFS server remote is detected, Git LFS will issue an error similar to
failed: missing protocol.
Once enabled, LFS Locking is available via the LFS | Lock command from the Files View in all SmartGit Views:
- The Files View of the Working Tree Window
- The Local Files perspective of the Standard Window
- The Files View of the Log Window (provided that the Working Tree node of the commit graph is selected)
Similarly the LFS | Unlock command will unlock the file on the LFS server, allowing others to modify it.
Displaying locks
To view Git-LFS lock states in the Files views (both Log and Working Tree Windows), Git-LFS locks verification must be enabled for your repositories.
git config 'lfs.https://github.com/<my_repo>.git/info/lfs.locksverify' true
Technical Note on LFS Locks Verification
The lock verification configuration is stored in git.config with the section [lfs "https://server/repo.git/info/lfs"]:
[lfs "https://github.com/myrepo.git/info/lfs"]
    ...
    locksVerify = true
When lock verification is enabled, SmartGit will invoke the following additional commands in the background:
git lfs locks --localgit lfs locks --remote
These commands will run after every Pull, Fetch, and after every background Fetch (if enabled under Preferences > Background Commands).
The output of these git lfs locks commands is written to:
./git/smartgit/lfs-locks-local./git/smartgit/lfs-locks-remote
Once these files are present, additional information is shown when viewing files in the Files View:
- The icon under the Name column will indicate the lock state of LFS files.
- in the Standard Window, when viewing Local Files , the LFS status will be shown on the right of the file name.
Example
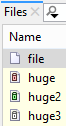
The following screenshot shows how this display appears:
file- a normal file to which no LFS lock information applieshuge- locked by someone elsehuge2- locked by youhuge3- lockable (configured in.gitattributes)
Note
In the Log window, lock states are only displayed for the Working Tree node.
Troubleshooting
- To enable the LFS | Lock command, set the property status.lfs.locks under Preferences > Low-Level Properties.
- If your git-lfs executable is not detected by SmartGit, try using absolute paths for the
Git-LFSexecutable in your gitconfig file (where the Git-LFS filter is defined). Alternatively, configure SmartGit to use the bundled Git under the Command Preferences options. - If you experience unexpected errors when using the Lock or Unlock commands, this may be due to a known behavior in Git-LFS v2.5. It may fail if the working directory path has incorrect case sensitivity.
To work around this issue, ensure that the path in
repositories.xmlhas the correct case. The drive letter must be uppercase. Example: `<obj type="@Repository" id="..."> <prop key="name" type="String" value="smartgit"/> <prop key="favorite" type="boolean" value="true"/> <prop key="git" type="boolean" value="true"/> <prop key="path" type="String" value="D:\\smartgit"/> <prop key="expanded" type="boolean" value="false"/> </obj>