
Azure DevOps
SmartGit provides integration with Azure DevOps, including:
- Azure DevOps Services (Cloud)
- Azure DevOps Server (On Premises)
Once integration is configured, the following integrated functionality is available from within SmartGit:
Setup
Azure DevOps integration is set up under Preferences, section Hosting Providers. Under the Add button, select Azure DevOps. This opens the Add Hosting Provider dialog and prompts for an access token.
Use a Personal Access Token (PAT) to connect SmartGit to Azure DevOps.
Warning
Azure DevOps OAuth is deprecated by Microsoft. New Azure DevOps OAuth app registrations are no longer accepted since April 2025. Existing Azure DevOps OAuth apps stop working on 2026-07-24. For SmartGit, use a Personal Access Token instead of OAuth.
Setup via Personal Access Token
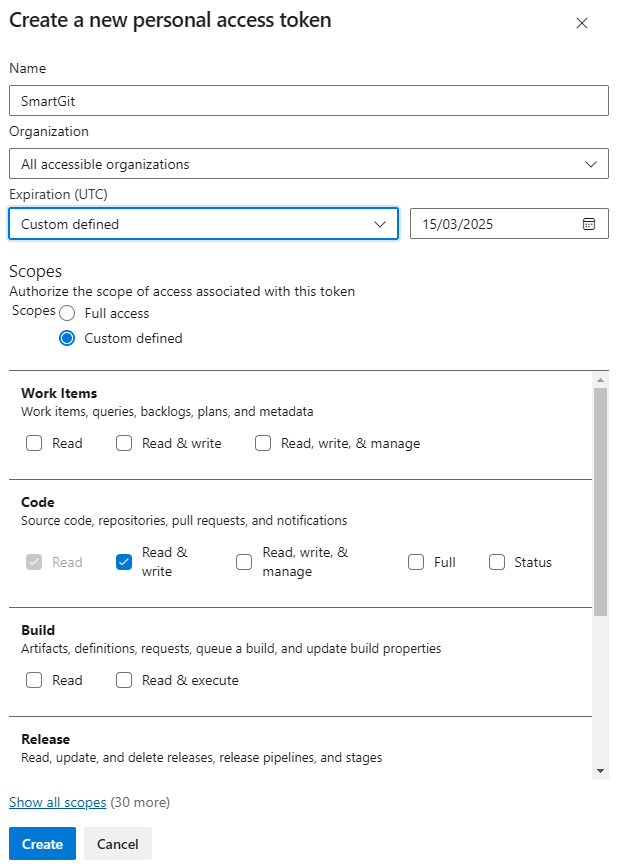
You can connect SmartGit to Azure DevOps by providing a Personal Access Token (PAT). Microsoft describes a PAT as an alternative password for Azure DevOps. You can create PATs in the Azure DevOps portal from User Settings -> Personal access tokens. To get there, you first need to open one of your Azure DevOps organizations. To create a PAT that works with SmartGit:
- Open https://aex.dev.azure.com/me to see the organizations available for your account.
- Navigate to any of your organizations.
- Click User Settings in the top-right corner and select Personal access tokens.
- Create a new token and make sure that:
- Organization access is set to All accessible organizations.
- Under Scopes, only Code -> Read & write is required.
- Choose an expiration date that is allowed by your Azure DevOps policy.
- Copy the generated token and paste it into SmartGit.
Warning
The most important setting is Organization access -> All accessible organizations. SmartGit requires this setting even if you currently use only one organization. If authentication fails, first create a new PAT with All accessible organizations and try again.
For additional details, see Microsoft’s Personal Access Token documentation.
Setup with multiple accounts
If you have multiple Azure DevOps accounts, you can run through the above procedure for each of your accounts. This requires you to sign in for each account in your web browser before creating the PAT.
To have Git work reliably with multiple Azure DevOps accounts, Git has to request credentials per repository.
To check whether the proper configuration is already set, invoke:
git pull
If Git requests credentials only for dev.azure.com, configure:
git config --global credential.dev.azure.com.useHttpPath true
Then run git pull again to confirm that Git will now ask for the complete repository URL.
Setting up a Custom Azure DevOps Application for SmartGit
This OAuth-based setup is legacy and should no longer be used for new SmartGit setups. Microsoft has deprecated Azure DevOps OAuth, new Azure DevOps OAuth app registrations are no longer accepted, and existing Azure DevOps OAuth apps stop working on 2026-07-24.
Microsoft recommends Microsoft Entra OAuth as the long-term replacement for Azure DevOps OAuth. However, Microsoft also documents that Entra apps do not yet natively support Microsoft account (MSA) users for the Azure DevOps resource. Because of this, Microsoft Entra OAuth is currently not a drop-in replacement for all SmartGit users.
Use a Personal Access Token for SmartGit instead.
Authentication hints
If Azure DevOps authentication fails in SmartGit, create a new PAT and verify the following points:
- Organization access is set to All accessible organizations.
- The PAT has Code -> Read & write scope.
- You created the PAT while signed in to the correct Azure DevOps account.
Azure DevOps OAuth app secrets expire after 60 days and must be rotated regularly. This is another reason why OAuth is no longer recommended for SmartGit.
For background, see Microsoft’s documentation on Azure DevOps OAuth deprecation, managing Azure DevOps OAuth application secrets, and Microsoft Entra OAuth.
Repository access using “Generate Git Credentials”
If you are only interested in accessing your Azure DevOps Git repositories, but you do not need the additional Azure DevOps Hosting Provider functionality in SmartGit, open the Azure DevOps website, navigate to your repository, invoke Clone, and then Generate Git Credentials. When SmartGit asks you for User Name and Password, enter these credentials.