
GitHub Integration
Once integration with GitHub has been set up, SmartGit provides the following additional integrated functionality:
In addition to integrating with GitHub’s repository features, it is possible to set up Bugtraq integration.
This enables further functionality:
- Bugtraq hyperlinks in commit messages can be linked back to to an Issue in Github.
- Issue selection from GitHub projects.
Setup
To set up GitHub integration in SmartGit, go to Edit | Preferences, navigate to the Hosting Providers section, and click the Add button. In the list of available providers, select GitHub to bring up a dialog allowing configuration of the GitHub account. SmartGit then prompts for an access token.
There are two ways to generate this access token:
- Allow SmartGit to autogenerate and manage an OAuth token (recommended).
- Manually generate a Personal Access Token (PAT) in GitHub.
Autogeneration of OAuth Token
The recommended method of access is via an autogenerated OAuth token. Leave the Token field blank, and instead click on the Generate Token button. This will open your default web browser, where you will need to confirm to GitHub that you authorize SmartGit for access to GitHub.
Note
Be sure to also Grant Access to each required organization; otherwise, the corresponding organization repositories won’t show up and can’t be accessed in SmartGit. You may need to complete multi-factor authentication formalities on GitHub if this has been configured on your GitHub account.
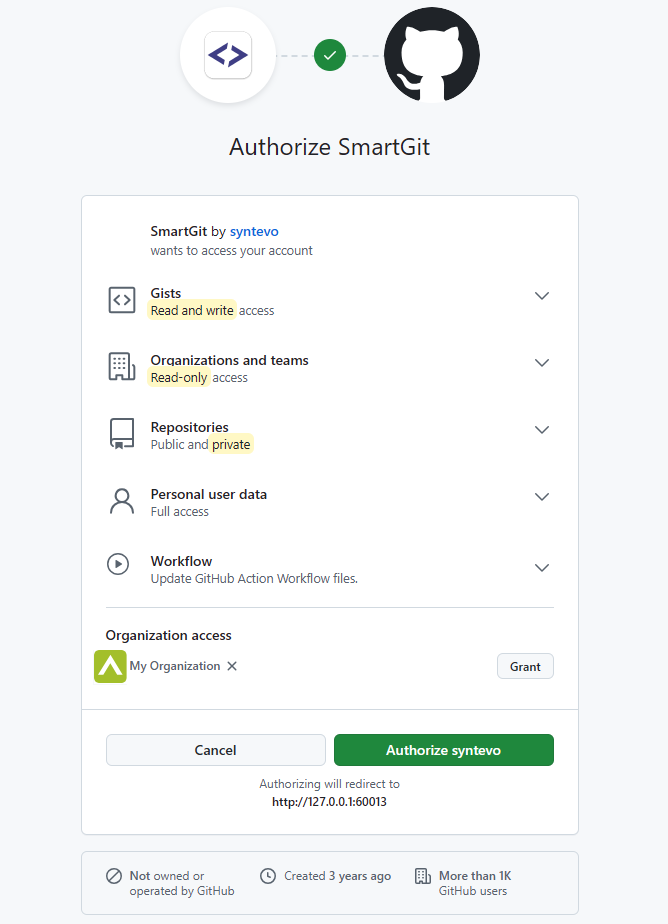
Once you have confirmed this page, you will be redirected to a SmartGit page confirming that access has been successfully granted.
(The page is on 127.0.0.1, where SmartGit is waiting to intercept the one-time authorization code generated by GitHub)
This code will be used to create an application access token, which will automatically populate the Token field.
Finally, confirm the Add Hosting Provider dialog by clicking using Add.
Note
If this redirection does not work, it may be caused by your browser’s HSTS configuration.
To resolve this problem, remove any entries for 127.0.0.1 and try again.
For more details on how to do this for various browsers, refer to this blog post.
By default, Use OAuth token for repository authentication will be selected. This will return the generated OAuth-token when Git asks for credentials (username and password) when connecting to your GitHub repository.
Using the OAuth-token has following advantages:
- Its scope is more limited than a plain password or more powerful personal access token.
- It eliminates the need to create or enter a second set of credentials for SmartGit.
Tip
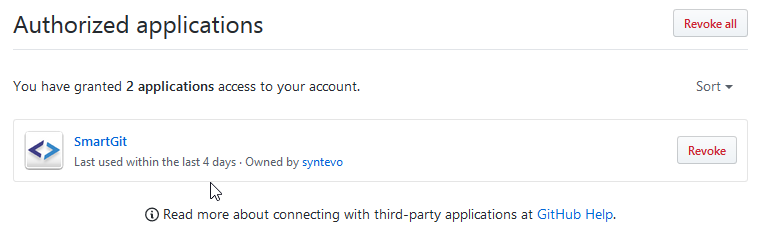
Once you have authorized SmartGit to integrate with GitHub, you can manage access under GitHub Settings -> Applications -> Authorized OAuth Apps. If you need to repeat the Authorization process outlined above, you should first Revoke SmartGit’s access on GitHub and start over.
Creating a GitHub Personal Access Token
Instead of using an OAuth token, you may alternatively use a GitHub Personal Access Token (PAT), which has to be created manually in your GitHub Developer Settings, and paste this in the Token input.
Please refer to the GitHub documentation for information on GitHub Personal Access Tokens.
When using PAT tokens, it is suggested that you first attempt using a Classic Token.
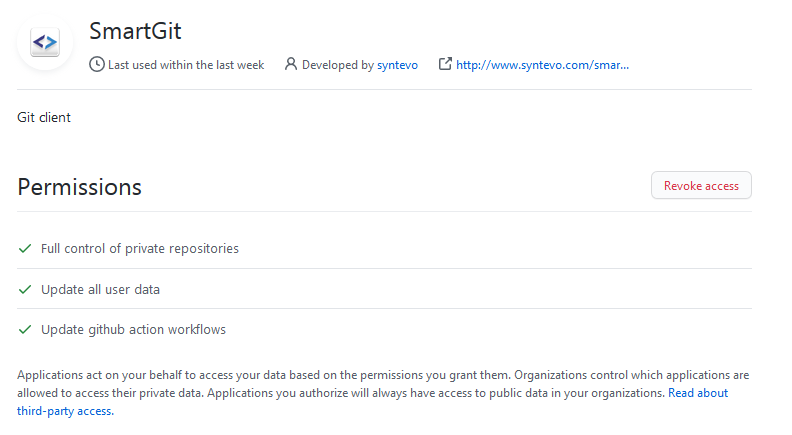
Make sure that your PAT has at least following scopes assigned:
- repo - i.e. public and private repositories
- read:org - i.e. read access to your organization(s)
- read:user - i.e. read access to your user data
- gist - read and write access to gists
- workflow - allowing SmartGit to update GitHub Action Workflow files
Once you have created a PAT for requisite access in your in GitHub profile, you need to copy the PAT token and paste it into the Token input in SmartGit’s Add Hosting Provider dialog.
Re-setup OAuth
Sometimes you may need to rerun the OAuth setup, e.g. if a more recent version of SmartGit will request additional scopes. Usually, it is sufficient to just open Preferences, section Authentication, open the GitHub hosting provider and invoke Generate Token. If this does not solve your problem, take following steps to rerun the OAuth setup from scratch:
- In SmartGit:
- remove all GitHub-related credentials from Preferences, section Authentication
- remove the GitHub hosting provider from Preferences, section Hosting Providers
- In GitHub, open the SmartGit application from your profile Settings -> Applications -> Authorized OAuth Apps:
- Select “SmartGit” there:
- Invoke Revoke Access
- Select “SmartGit” there:
- In SmartGit, rerun through the OAuth setup again:
- open Preferences, section Hosting Providers
- Add a new GitHub hosting provider, as described above
GitHub Issue Selection
If both of the following have been configured:
- GitHub integration by configuring an access token that allows SmartGit to authenticate with GitHub.
- Bugtraq configuration linking to the associated GitHub repository containing issues.
SmartGit will then allow you to select an issue from the configured GitHub project at the following points:
- From the hamburger (≡) menu above the Commit View, during Commit and Amend last Commit operations.
- From the Select dropdown during interactive rebase operations, such as Squash in the Journal and Graph Views.
Note
- Draft issues in GitHub will not be available for selection in SmartGit. These need to be converted to full issues and associated to a GitHub repository.
- Issues that have been closed on GitHub will not be available for selection. You may need to reopen an issue for it to be selectable within SmartGit.
- GitHub changed its Project design in 2024, and new GitHub Projects are now created at Organization level, and can be linked to one or more repositories.
Troubleshooting Possible Problems & Solutions
Authentication fails with 403: ‘Although you appear to have the correct authorization credentials…’
Up to (including) version 23.1, specific organization configurations may result in authorization problems such as:
Although you appear to have the correct authorization credentials, the … organization has enabled OAuth App access restrictions, meaning that data access to third-parties is limited. For more information on these restrictions, including how to enable this app, visit https://docs.github.com/articles/restricting-access-to-your-organization-s-data/
This problem is caused by:
- being a public member of a GitHub organization
- which has OAuth access restrictions configured (at least for SmartGit)
It may be resolved by asking your organization Administrator to change your membership (at https://github.com/orgs/<org>/people) from Public to Private, for organization <org>.
Private repositories do not show up/403 when trying to access an organization repository
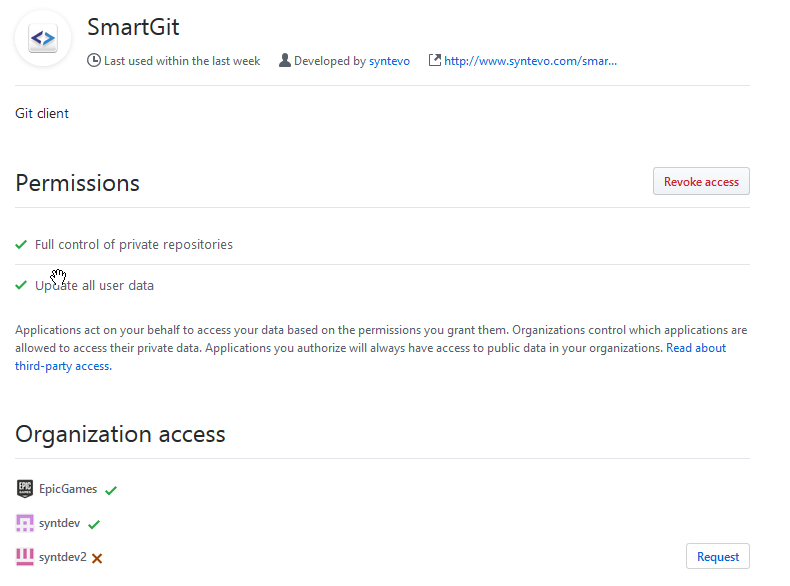
If you are authenticating using OAuth and you can’t see private repositories of your GitHub organization or pushing to your organization’s repositories fails with HTTP error code 403, make sure that your organization allows Third-party access and SmartGit is Approved. Your organization settings might look like this:
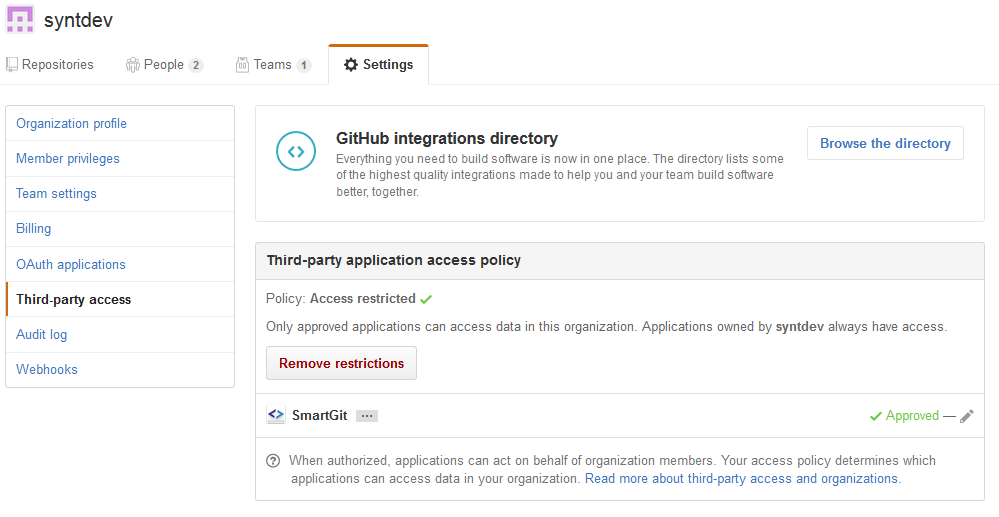
Note that the screenshot above shows the interface of the organization’s manager. If you are not the manager, but just a member of the organization, you can request access for the SmartGit application to this organization from your Settings -> Applications -> Authorized OAuth Apps:
select SmartGit here and check for which organizations you may request access. The screenshot below shows syntdev2 for which access can be requested. Once done so, the organization manager will receive a notification and may confirm.
Note
If your GitHub hosting provider is already set up in the Preferences and you need to rerun through the OAuth setup, as explained above.
Git-Flow Pull Requests will be closed on Finish Feature
When using Git-Flow or Git-Flow Light in combination with pull requests, they may be marked as Closed instead of Merged after invoking Finish Feature. This happens if Delete Feature Branch is selected for the Finish Feature dialog.
Solution
With this option selected, the local and remote feature branch will be deleted immediately, however the resulting merge/rebase has not yet been pushed. If a branch will be deleted before it has been merged, GitHub will mark the pull request as Closed. If it’s only deleted after the branch has been merged, it will be marked as Merged. If you don’t want your pull requests to become Closed, unselect Delete Feature Branch, push the resulting merge/rebase first and only then Delete the feature branch from GitHub (e.g. from the Branches view).
Push fails with OAuth ‘scope’-related warning
From time to time, GitHub may introduce new or change existing OAuth permission scopes. In this case, SmartGit’s OAuth token may stop working. The solution is usually to rerun through the OAuth setup, as explained above.
Note
Always use the latest SmartGit release, as it includes the most up-to-date required scopes. If you suspect that not even the latest version is requesting the scopes which are required for your scenario, you may manually change the scopes in the Preferences, Low-Level Properties, property “github.oauth.scopes”.
Typical Git error messages hinting to this kind of problem:
! refs/heads/some-branch:refs/heads/some-branch [remote rejected]
(refusing to allow an OAuth App to create or update workflow
`.github/workflows/some-workflow.yml` without `workflow` scope)
Distributed Reviews interference
When using GitHub, ensure that Distributed Reviews is disabled for your repository to avoid conflicts between GitHub and Distributed Reviews pull requests. To check:
- Invoke Review | Configure
- If SmartGit asks you whether to initialize the Review database, Distributed Reviews are not enabled (as it should be). Select Cancel to keep it disabled.
- If SmartGit asks you what to configure, Distributed Reviews are enabled. Select Dispose Database to disable it.